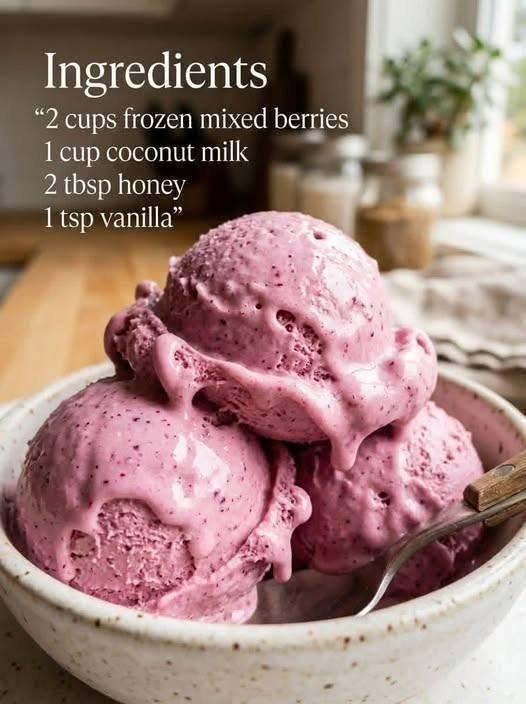
Homemade Mixed Berry Ice Cream – Creamy, Fruity and Bursting with Berry Flavour
There is something incredibly satisfying about making homemade ice cream, especially when it’s packed with the fresh, sweet and slightly tangy flavours of mixed berries. It’s one of those desserts that instantly makes an ordinary day feel a little more special. Whether you’re enjoying a quiet evening at home, treating your family on the weekend or looking for something refreshing on a warm afternoon, this mixed berry ice cream is always a lovely idea.
I have always loved berry desserts. Strawberries, blueberries, raspberries and blackberries each bring something different to the table. Some are sweet, some are slightly tart, and when you combine them, the flavour is absolutely wonderful.
I wanted to try making an ice cream that brought all these beautiful flavours together without needing an ice cream machine or complicated ingredients. The result was a creamy, fruity dessert with a gorgeous natural berry colour and little bursts of berry goodness in every spoonful.
What I particularly love about this recipe is the balance between the rich creaminess and the refreshing fruit flavour. The berries add a natural sweetness and slight tanginess, while the condensed milk gives the ice cream a smooth, velvety texture.
It’s also a wonderful dessert to prepare ahead of time. You can make it, leave it in the freezer and have something delicious ready whenever a sweet craving strikes!
Why You’ll Love This Mixed Berry Ice Cream
There are so many reasons this homemade ice cream deserves a place in your dessert collection.
-
Packed with berry flavour: A delicious combination of strawberries, blueberries, raspberries and blackberries.
-
No ice cream machine needed: You can prepare this recipe using a regular electric hand mixer or stand mixer.
-
Rich and creamy texture: Whipped cream and condensed milk create a wonderfully smooth consistency.
-
Beautiful natural colour: Mixed berries give the ice cream a gorgeous pink-purple shade.
-
Easy to prepare: You only need a handful of simple ingredients.
-
Perfect for summer: A refreshing homemade treat for warm afternoons and family gatherings.
-
Customizable: Add chocolate chips, chopped nuts or extra berries to make it your own.
Ingredients You’ll Need
The ingredients are simple, and you can use fresh or frozen berries depending on what’s available.
For the mixed berry mixture
-
1 cup strawberries, fresh or frozen
-
½ cup blueberries
-
½ cup raspberries
-
½ cup blackberries
-
2 tablespoons sugar
-
1 teaspoon lemon juice
For the ice cream
-
2 cups cold heavy whipping cream
-
1 can (approximately 395 g) sweetened condensed milk
-
1 teaspoon vanilla extract
-
A small pinch of salt
Optional toppings
-
Fresh mixed berries
-
White chocolate chips
-
Chopped almonds or pistachios
-
Crushed digestive biscuits
-
A little berry sauce
-
Fresh mint leaves
How to Make Homemade Mixed Berry Ice Cream
Step 1: Prepare the mixed berries
Start by washing the fresh berries thoroughly and allowing them to drain.
If you’re using frozen berries, you can use them directly for cooking.
Add the strawberries, blueberries, raspberries and blackberries to a small saucepan. Sprinkle in the sugar and add the lemon juice.
Place the saucepan over medium heat and cook for approximately 6–8 minutes, stirring occasionally.
As the berries warm up, they will soften and release their beautiful juices. Gently mash some of them with the back of a spoon.
I like leaving a few small berry pieces because they add lovely little pockets of fruit throughout the finished ice cream.
Step 2: Cool the berry mixture
Once the berries have softened and the mixture has thickened slightly, remove the saucepan from the heat.
Allow it to cool completely.
You can blend the mixture until smooth if you prefer a silky ice cream, or leave it slightly chunky for more texture.
For an especially smooth result, pass the berry puree through a fine-mesh sieve to remove the raspberry and blackberry seeds.
Transfer the cooled mixture to the refrigerator for about 20–30 minutes.
It’s important that the berry mixture is completely cold before combining it with the whipped cream.
Step 3: Whip the cream
Pour the cold heavy whipping cream into a large mixing bowl.
Using an electric hand mixer, beat the cream until medium-stiff peaks form.
This usually takes around 3–5 minutes, depending on your mixer.
Be careful not to overwhip it. The cream should be thick, fluffy and hold its shape without becoming grainy.
This step is what gives homemade no-churn ice cream its lovely airy texture.
Step 4: Add the condensed milk
Pour the sweetened condensed milk into a separate bowl.
Add the vanilla extract and a small pinch of salt. Stir until combined.
Gently fold the condensed milk mixture into the whipped cream using a spatula.
Use slow, gentle movements to preserve as much air as possible.
The mixture should become smooth, thick and creamy.
Step 5: Add the berry mixture
Now comes my favourite part!
Add the cooled mixed berry puree to the cream mixture.
You can gently fold it in for a soft pink-purple colour throughout, or swirl it through using a spatula to create beautiful berry ribbons.
I personally love the swirled effect because every scoop looks slightly different, with colourful streaks of berry throughout.
If you saved a few whole or chopped berries, fold them in gently at this stage.
Step 6: Freeze the ice cream
Transfer the mixture into a freezer-safe container.
Smooth the top with a spatula and drizzle any remaining berry puree over the surface.
Use a toothpick or knife to create a few decorative swirls.
Cover the container tightly with a lid or plastic wrap.
Place it in the freezer for at least 6–8 hours, preferably overnight, until completely firm.
Step 7: Scoop and serve
Remove the ice cream from the freezer and let it sit at room temperature for approximately 3–5 minutes before scooping.
Use an ice cream scoop to serve it in bowls or cones.
Finish with fresh strawberries, blueberries, raspberries or your favourite toppings.
And there you have it! Beautiful homemade mixed berry ice cream that’s creamy, fruity and full of delicious berry flavour.
My Tips for Perfect Homemade Berry Ice Cream
After making homemade ice cream, I’ve learned that a few simple details can make a big difference.
-
Use cold whipping cream: Always start with properly chilled cream for the best whipping results.
-
Cool the berries completely: Warm berry puree can melt the whipped cream and affect the texture.
-
Don’t overwhip: Stop once the cream reaches medium-stiff peaks.
-
Use good-quality condensed milk: It provides sweetness and helps create a smooth texture.
-
Don’t overmix the berry swirl: A few gentle folds create beautiful ribbons of colour.
-
Freeze in a shallow container: This helps the ice cream freeze more evenly.
-
Allow time to soften before serving: A few minutes outside the freezer makes scooping much easier.
Delicious Variations You Can Try
One of the best things about homemade ice cream is that you can easily change the flavours.
1. Mixed Berry Chocolate Ice Cream
Add ½ cup of dark or white chocolate chips to the mixture before freezing. The chocolate adds a lovely richness that pairs beautifully with the berries.
2. Mixed Berry Cheesecake Ice Cream
Add 100 g of softened cream cheese to the condensed milk mixture and fold in crushed digestive biscuits. It creates a delicious cheesecake-inspired dessert.
3. Strawberry Blueberry Ice Cream
Use mostly strawberries and blueberries for a sweeter, milder berry flavour.
4. Mixed Berry Yogurt Ice Cream
Replace part of the whipped cream with thick Greek yogurt for a tangier flavour. Keep in mind that the texture will be different from the traditional creamy no-churn version.
5. Mixed Berry Pistachio Ice Cream
Add chopped pistachios before freezing. Their nutty flavour and beautiful green colour complement the berries wonderfully.
6. Vegan Mixed Berry Ice Cream
Use chilled coconut cream and a suitable dairy-free condensed milk alternative. Check that all your ingredients are plant-based.
What to Serve with Mixed Berry Ice Cream
This ice cream is delicious on its own, but it also pairs wonderfully with other desserts.
-
Warm brownies with a scoop of berry ice cream.
-
Fresh waffles or pancakes.
-
Chocolate cake or vanilla sponge cake.
-
Warm apple crumble.
-
Homemade crepes with fresh berries.
-
Crushed biscuits and extra berry sauce.
For a simple dessert when guests come over, serve two scoops in a glass bowl with fresh berries and a little melted white chocolate. It looks beautiful and takes hardly any extra effort.
How to Store Homemade Mixed Berry Ice Cream
Proper storage helps maintain the flavour and texture.
-
Freezer: Store in an airtight, freezer-safe container for approximately 2–3 weeks for the best quality.
-
Prevent ice crystals: Press a piece of baking paper or freezer-safe wrap against the surface before closing the container.
-
Avoid repeated thawing: Scoop only what you need and return the container to the freezer promptly.
-
Serving: Allow the ice cream to soften for a few minutes before scooping.
For the best creamy texture, avoid leaving the ice cream at room temperature for extended periods.
Frequently Asked Questions
1. Can I make mixed berry ice cream without an ice cream machine?
Absolutely! This is a no-churn recipe, so you only need an electric mixer, mixing bowls and a freezer-safe container.
2. Can I use frozen mixed berries?
Yes! Frozen berries work beautifully. Cook them with the sugar and lemon juice until soft, then cool the mixture completely before using.
3. Can I use only strawberries and blueberries?
Of course. You can use any combination of berries you enjoy. Strawberries and blueberries make a particularly delicious combination.
4. Why is my homemade ice cream too hard?
Homemade ice cream can become quite firm after several hours in the freezer. Allow it to sit at room temperature for 3–5 minutes before scooping.
5. How do I make the ice cream smoother?
Make sure your cream is properly whipped, your berry puree is completely cool and you fold everything together gently. Removing the berry seeds by straining the puree can also create a smoother texture.
6. Can I reduce the amount of condensed milk?
Yes, but remember that condensed milk contributes both sweetness and texture. Reducing it too much can make the ice cream less creamy and harder when frozen.
7. Can I add fresh berries directly without cooking them?
You can, but cooking the berries first creates a concentrated fruit sauce and reduces excess moisture. This generally gives a better flavour and texture.
8. Is homemade mixed berry ice cream healthier than regular ice cream?
It contains real fruit, which provides fibre and micronutrients, but it still contains cream and sweetened condensed milk. It is best enjoyed as an occasional dessert.
Nutritional Information
The following nutritional information is estimated per serving, assuming the recipe makes 12 servings.
Values are approximate and may vary depending on the berries, cream and condensed milk brands used.
|
Nutrient |
Amount per serving |
|---|---|
|
Calories |
265 kcal |
|
Total Fat |
18 g |
|
Saturated Fat |
12 g |
|
Carbohydrates |
24 g |
|
Dietary Fibre |
2 g |
|
Total Sugar |
21 g |
|
Protein |
4 g |
|
Cholesterol |
65 mg |
|
Sodium |
55 mg |
|
Potassium |
180 mg |
Final Thoughts
Homemade mixed berry ice cream is one of those desserts that makes you appreciate how wonderful simple ingredients can be. I love how a handful of colourful berries can transform ordinary cream into something so beautiful and delicious.
The creamy texture, sweet berry flavour and little tangy notes from the fruit make every spoonful feel special. And the best part? You don’t need an expensive ice cream machine or complicated techniques to make it at home.
It’s a lovely recipe to prepare for weekend family treats, summer gatherings, birthday celebrations or simply those evenings when everyone wants something sweet after dinner.
Make a batch, keep it in the freezer and enjoy a scoop whenever you need a little homemade happiness. Sometimes, the simplest desserts are the ones everyone remembers!